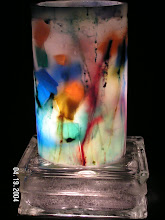
You simply break up different colored wax chunks, put them in a mold, and pour melted wax over them. This candle will harden faster than any other candle you may have poured, because the "chunks" are already hardened.
There are two ways to do make CHUNK candles:
{When you are finished reading this post, click on the LINK at the end, and go view the FREE Slide Show at www.moonvalleycandles.com . You will see the steps in making a "chunk" candle}.
{When you are finished reading this post, click on the LINK at the end, and go view the FREE Slide Show at www.moonvalleycandles.com . You will see the steps in making a "chunk" candle}.
1) Wick up a mold, pour in melted wax up to a level that will let you add "chunks" to fill up the rest of the mold to the top. Add whatever colored chunks you want, and pop it in a refrigerator, water bath, or freezer to cool it quickly. After letting the candle mold cool for 10-15 minutes (depends on the temperature), pull it out, and poke holes in it with a sharp "tool" to let any trapped air out. Add some more melted wax to "top it off", and place it back in your cooling area -- refrigerator, water bath, or freezer. It will be hard and ready to extract (de-mold) in a fairly short amount of time. Presto! Finished candle. Level the bottom of the candle on a hot skillet or pan, and set it on some waxed paper. Hold the candle upside down, and examine if the candle is level and flat. Making sure the skillet or pan is level first is a good idea, and makes this procedure a lot easier.
2) Wick up a mold, fill the mold with broken colored "chunks", and pour pure melted wax over the chunks, up to the top of the mold. Pull the mold out after 10-15 minutes of cooling, poke holes in it with a "tool" like a copper wick rod, knife, pencil, or whatever to let any trapped air out. Top it off with hot wax (160-175 degrees -- buy a wax thermometer to check the temperature). Having the wax fairly hot allows the new wax to "bond" to the already cooled wax.
THINGS TO CONSIDER:
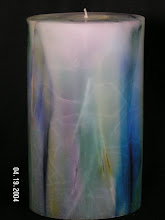
1) The use of "color" is key to the appearance of your finished candle. You may have a color scheme you want to create... For example: You desire a candle with just two colors. Say, a light blue candle with yellow chunks. You know ahead of time, that any colored chunks will "bleed" their colors into newly poured hot wax. Okay. With this in mind, pour a light blue colored wax into your mold. Let it start to harden a little bit. You might put it in the refrigerator, water bath, or freezer for a few minutes. Check on it. When the outside starts to harden to maybe 1/8" or a1/4" inch, you pull your mold out, and drop in your yellow chunks. Put it back in your cooling space. Bring it out once again once it looks like it is hardening up well. Poke some holes in it. Top it off with more of your light blue wax, and put it back in your cooling space to finish hardening up. Soon, you will have a finished candle of light blue with yellow chunks. Keep in the back of your mind that blue and yellow mixed together makes "green". After some experimentation, you will understand how temperature and wax cooling interact to create different colors.
2) If you want specific colored chunks to work with, you'll have to "make" them. Get a cookie sheet or pan, line it with foil, and pour the colored wax of your choice into the pan. After it has cooled to a fairly thick viscous state, you can cut it into pieces by drawing a knife through it. Put it back in your refrigerator or freezer to harden completely. It will then be easy to break it up into colored chunks. You can also use cookie cutter designs to "stamp" out shapes you like prior to the wax hardening in your cookie sheet or pan. There are many inexpensive cookie cutter designs you can find at hobby stores for instance. Hearts, clovers, angels, circles, squares, stars, whatever you like. We call these "embeds". Because you would fill your candle mold up with melted wax, let it harden a bit, and then "embed" or place the chunks along the outer edges of the mold. You can use chopsticks for example to place the chunks along the sides of the mold so they will be visible in your finished candle. Put your mold back into the cooler soon after embedding the chunks to harden them in place.
3) Check out the FREE slide show I have for you on my website at www.moonvalleycandles.com. You can access it by clicking on the lime green copy on the right side of the homepage. It says -- it says "Free 6 minute slide show, Click Here". Put in your email address, and watch the slide show. These are the basic steps to making a chunk candle.